

Learn how to Import COPYRIGHT FREE MUSIC to Sharefactory on PS5 in Minutes! Using music from the YouTube Audio Library this step-by-step guide covers downloading, transferring via USB, and seamlessly adding music to your projects. Enhance your videos with custom tracks while avoiding copyright issues (always check the copyright situation yourself before using any music).
Adding copyright-free music to your Sharefactory projects on PS5 is quick and easy with YouTube’s Audio Library. This guide walks you through formatting a USB stick, downloading music, transferring files, and importing tracks into Sharefactory. You’ll also learn how to organize your music, troubleshoot errors, and enhance your videos with custom audio. Follow these simple steps to upgrade your content!
Table of Contents
How to Import COPYRIGHT FREE MUSIC to Sharefactory on PS5 in Minutes!
Music can make or break a video, and Sharefactory on the PS5 allows you to import custom copyright-free tracks for a personalized touch. This tutorial will show you how to download music from YouTube’s Audio Library, transfer it via USB, and import it into your Sharefactory project. By the end, you’ll have a fully customized soundtrack for your gaming content.
What you will need: a USB Stick / PC or Laptop / PS5
Step 1: Prepare Your USB Stick (optional)
Before transferring music, you need to check your usb stick is suitable for use with the PS5 so worth checking that it is properly formatted. Here’s how:
Note that following the below steps will erase any data on the usb so worth saving it all somewhere else before completing the next step.
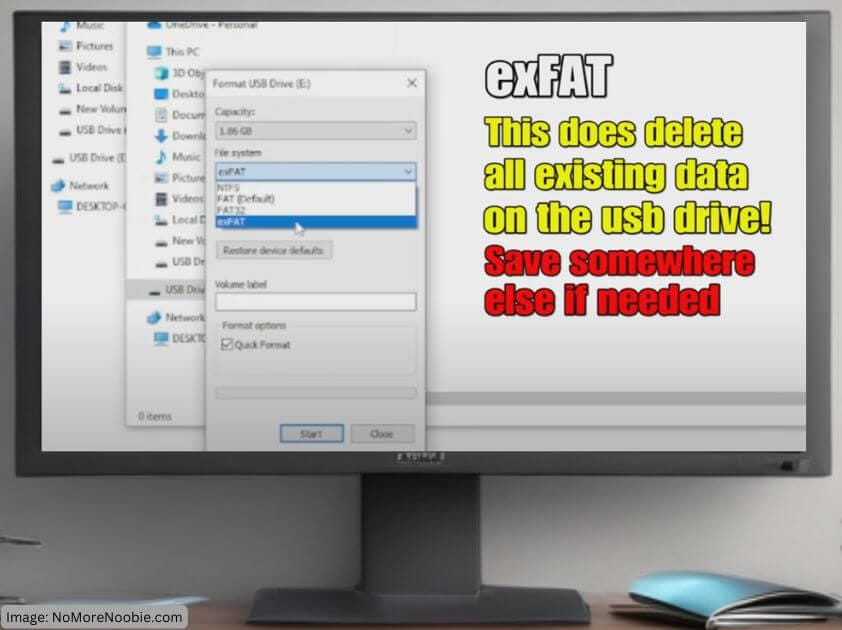
- Plug your USB stick into a PC or laptop.
- Right-click the USB drive and select Format.
- Choose exFAT as the file system (this will erase all data, so back up any files first).
- Click Start to format the drive.
Once formatted, create the necessary folders:
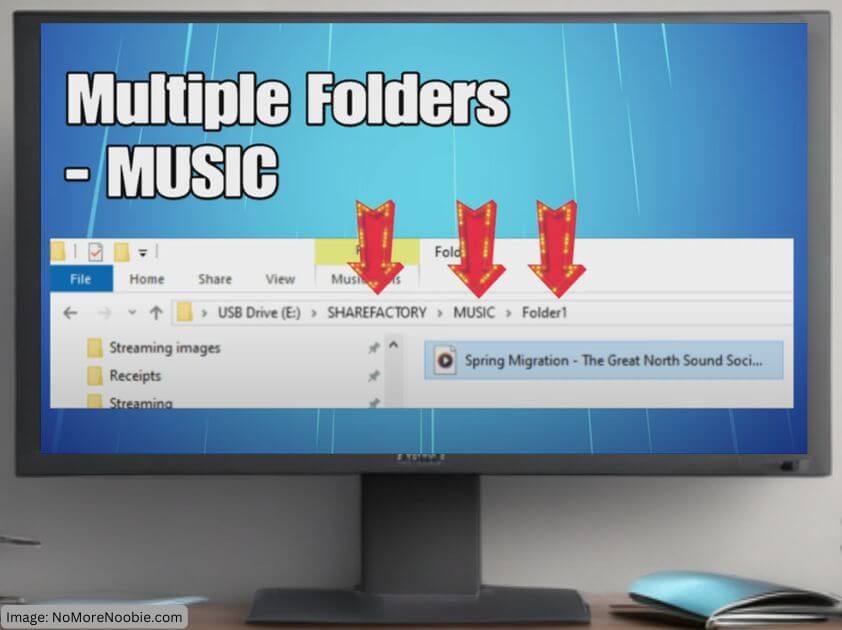
- Open the USB drive and create a new folder named SHAREfactory.
- Inside SHAREfactory, create another folder called Music.
- (Optional) Organize your music further by creating subfolders within the Music folder. Ie Folder1, Folder2 etc
Step 2: Download Copyright-Free Music from YouTube Audio Library
YouTube offers a library of royalty-free music that you can use in your videos. Here’s how to access and download it:
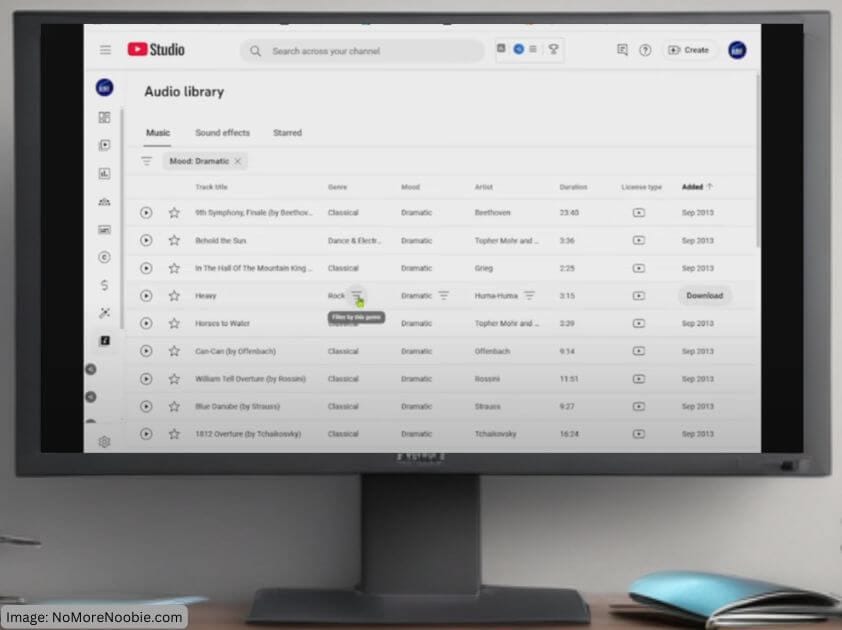
- Open YouTube Studio on your PC.
- Click Audio Library in the left-hand menu.
- Use filters to find tracks by genre, mood, or artist.
- Preview tracks and check their license type to confirm they are copyright-free.
- Click the Download button to save the track to your PC.
Step 3: Transfer the Music to Your USB Stick
Now that you have downloaded your chosen track to your PC/Laptop, move it to your USB stick:
- Locate the downloaded music file on your PC.
- Drag and drop the file into the SHAREfactory > Music folder on your USB.
- Remove the USB drive from your PC.
Supported Music Formats for Sharefactory
Ensure your music file is in a compatible format. Sharefactory supports:
- MP3
- MP4
- OGG
- AMR
- 3GP
- 3GP2
- AAC
- M4A
- WAV
Check that your music file meets these requirements before transferring.
Bitrates accepted are: 64 to 320kbps (best = 320kbps with constant bitrates)
Step 4: Import Music into Sharefactory on PS5
With your USB loaded with music, it’s time to import it into Sharefactory:
- Insert the USB stick into your PS5.
- Open Sharefactory and go to Toolbox > Import Music.
- Select Import from USB.
- Choose the track(s) and press X to select it.
- Press Square to import the file.
Your imported music is now ready to use in your projects!
Step 5: Add Imported Music to Your Sharefactory Project
Now that your track is imported, follow these steps to add it to a video:
- Open your project that you want to add music to in Sharefactory.
- Navigate to the point where you want to add the music.
- Press X and select Add Music.
- Choose your imported track and press X to add it.
Editing Your Music in Sharefactory
Once added, you can press Square to edit the music:
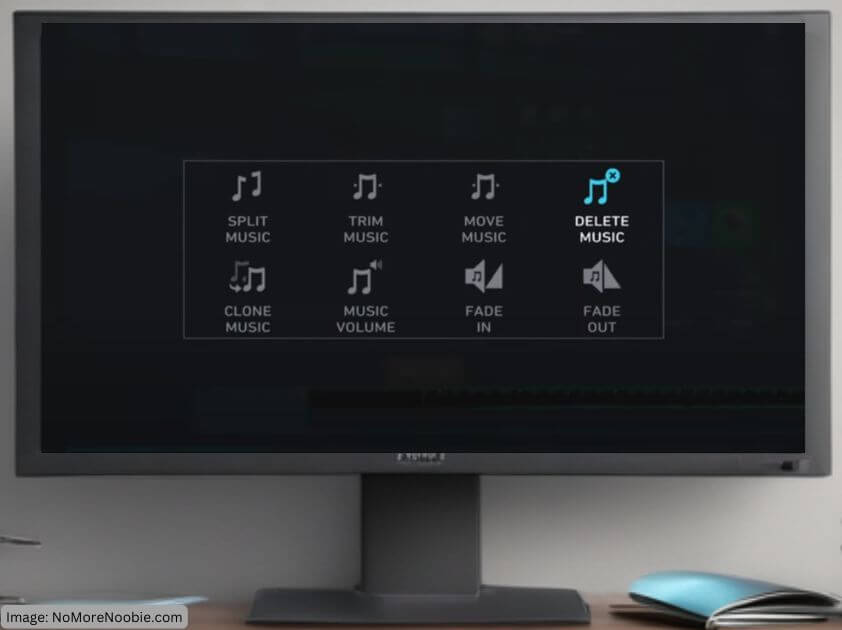
- Trim or Split the track
- Adjust Volume levels
- Fade In/Out for smooth transitions
- Clone the track to repeat sections
Experiment with these tools to fine-tune your video’s audio!
Thats the music added so just carry on editing the rest of your project as usual.
Troubleshooting: Common Import Issues
If your music isn’t appearing in Sharefactory Studio, check these three things:
✅ USB is formatted to exFAT
✅ Music file is in a supported format (See above))
✅ Folders are named correctly (SHAREfactory > Music)
If issues persist, try reformatting your USB and re-downloading the file but do ensure you save anything important on your usb before reformating as it will delete any existing files.
Bonus Tips & Next Steps
🎮 Upgrade Your Setup – If you’re serious about creating high-quality gaming videos, consider these tools:
🔹 External SSD for Faster Editing – Check it out on Amazon
🔹 USB 3.0 Stick for Quicker Transfers – See the best options here
🔹 Noise-Canceling Headphones for Better Editing – Find the best deals
Final Thoughts
Now you know how to import copyright-free music into Sharefactory on PS5! Custom music can make your videos stand out and create a unique brand for your channel.
Want more Sharefactory tips? Check out these related guides:
➡ Best Sharefactory Effects for Pro Editing
➡ How to Add Voiceovers in Sharefactory
If you found this guide helpful,and watched the Youtube tutorial please hit the like button, subscribe to my YouTube channel, and let me know in the comments what tutorials you’d like to see next! 🚀